New Zealand Gold Prospecting & Metal Detecting Forums Archive


The forum has moved to community.paydirt.co.nz, see you there!

This forum is now an archive to preserve the knowledge and finds posted here.

Alistair  
Posted : Monday, 14 November 2011 11:03:29 PM(UTC)
Alistair

Rank: Gold Flake

Groups: Registered
Joined: 14/10/2011(UTC)
Posts: 20
Man
Location: Auckland

Thanks: 4 times
Was thanked: 3 time(s) in 3 post(s)
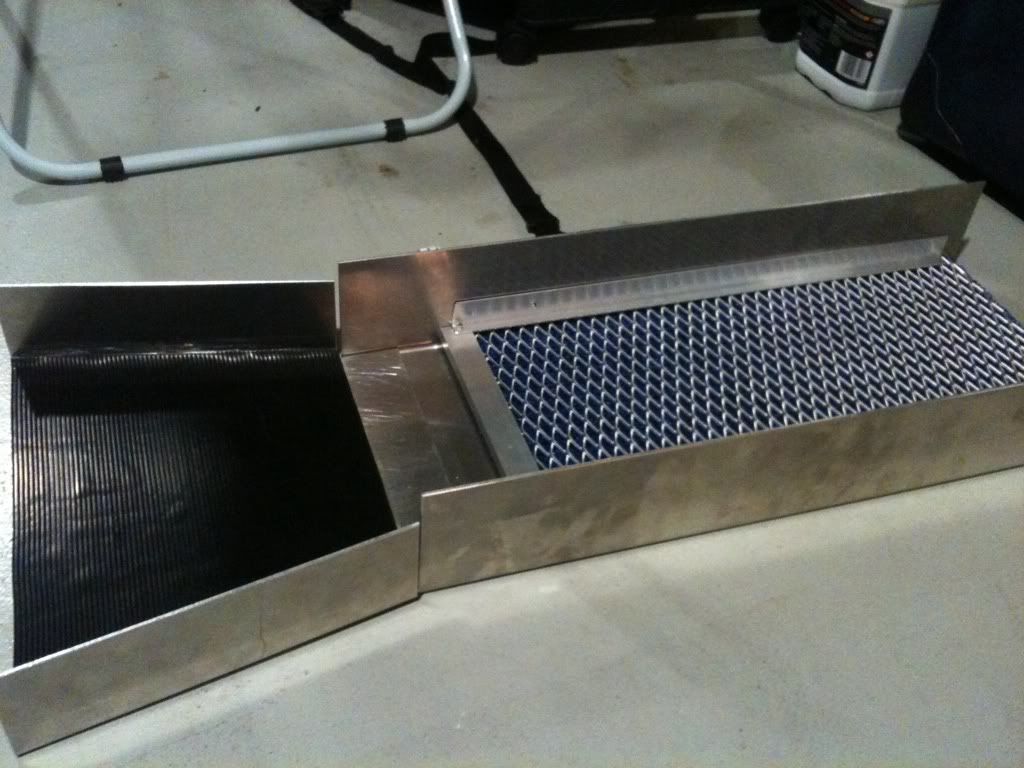
I have been out of action the last couple weeks with exams at uni keeping me tied up but now I'm finished and my backs starting to heal nicely. So what do you do when you can get out into the hills? You get yourself ready for when you can. I managed to get the guys at work to fold up the box and flare out of scrap 3mm aluminium so that didn't cost me a thing. I found some expanded 12x 30mm aluminium gridmesh at one of our companies suppliers an got that cheap on the companies account (but paid cash $15) then some rubber to fit in the flare cost next to nothing ($5) and some 25x12mmx2mm angle for a riffle and to keep the grid mesh down from works scap pile. The only thing I paid decent money for was the blue loop matting which was about $20. Add in a bit of glue an a couple of bolts with wingnut and you've got a cheap (under $50) sluice. I went for just a single riffle, well not really a true riffle but a step up to the carpet and gridmesh as most of the gold I find is quite fine and in low water flows. Its not quite finished bit it's very nearly there. Now I just have to wait a few more weeks before I'm aloud to test it out!!!! I can't wait.

UserPostedImage

Hopefully she works without true riffles other wise I will just make refinements to whats there and put in proper riffles. I think she should be pretty good though.
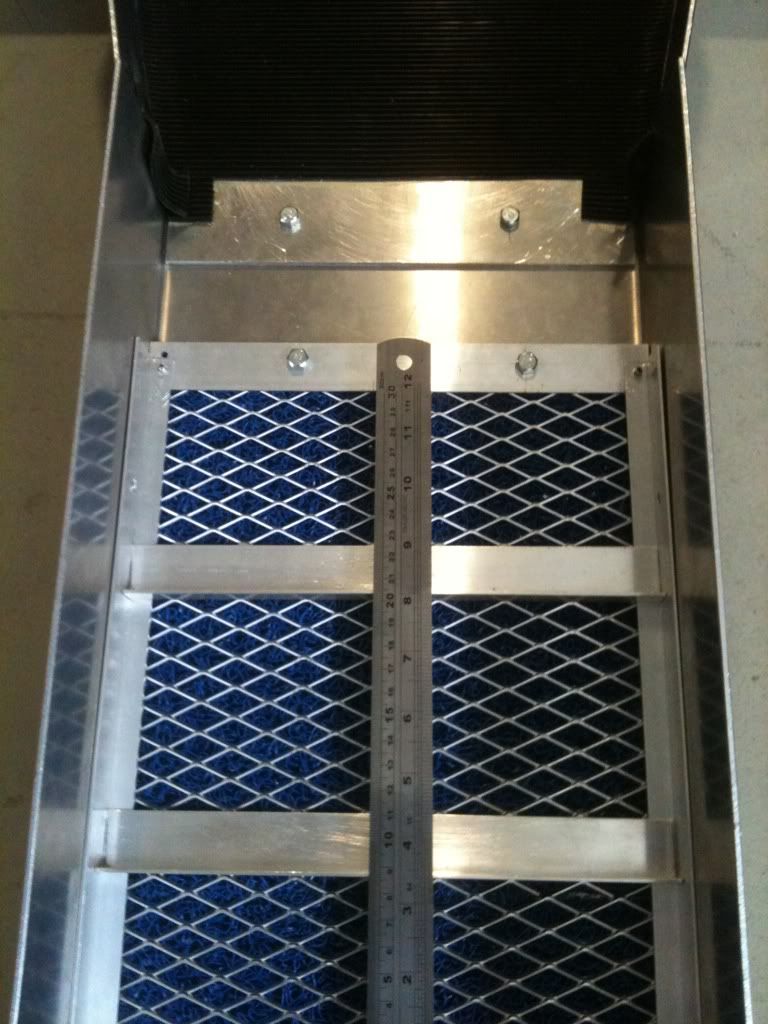
The length of the box without the flare is 600. Height of box is 80 an it's 240 wide.
ytb8ta7  
Posted : Tuesday, 15 November 2011 9:15:06 AM(UTC)
ytb8ta7

Rank: Gold Nugget

Groups: Registered
Joined: 6/08/2011(UTC)
Posts: 35
Location: maruia

Thanks: 4 times
Was thanked: 3 time(s) in 3 post(s)
looks bloody good to me but i would add an extra riffle or two just so ya dont get that hope its not washin straight through feelin. i hate that.
simon  
Posted : Tuesday, 15 November 2011 9:19:53 AM(UTC)
simon

Rank: Gold Ingot

Groups: Registered
Joined: 7/01/2011(UTC)
Posts: 789
Man
Location: Central Otago

Thanks: 33 times
Was thanked: 239 time(s) in 150 post(s)
nice work alistair.

can i make a couple of suggestions in regards to your sluicebox.

add some hungarian riffles. maybe look on the net and see a video of how these work. when the sluice is set at the correct angle in the river in correlation with the water flow you have at the time the riffles will make the blacksands "dance". this is essential for keeping the sluicebox blockage free. ie. a clogged box will not work to its full potential and some gold will escape. essentially the riffles are replicating the rocks and obstructions in a waterway that catch gold. without obstructions the gold will find the shortest path out of there. the riffles don't need to be evenly space. some people that buy production sluiceboxes even rearrange the riffles so they are at varying distances apart. i have had years of use with my sluicebox and i have never seen gold past my 3rd riffle, even when being as rough as i can.

secondly, how does this assemble and disassemble? quick assembly and disassembly means you have more time to hunt for gold and less time pissing about with your gear. check out how some of the other sluiceboxes do this. an easy way is to use wingnuts. if you are lucky you can get wingnuts with wider threads, these are easier to put on and off as the grit gives you less trouble in the threads. an easy way to do this would be to add a flat bar on the bottom end and put a single wingnut in the centre.

what hold the top end of the mesh? an easy way to hold this down is add a little bolt or rivet a little chunk of scrap metal on the sides. then the mesh setup can easily slide under this (remembering the whole mesh setup can't slide out and float away as its secured by the wingnut at the bottom end).

what holds the flare where it meets the sluice? i can see a good sized gap up the sides. if you extended the metal side so it overlaps the sluice just like what the bottom has you could easily hold the flare to the sluice with bolts, one on each side and a couple on the bottom. again if you used wingnuts on these bolts you can easily disassemble when you go bush so it all fits in a backpack.

finally, a good handle will make a huge difference. doesn't matter what its made of too much as long as its sturdy. after walking miles up a trail, or even short distances, its amazing how much easier a handle makes it for carrying.

good luck for summer.

Alistair  
Posted : Tuesday, 15 November 2011 6:24:12 PM(UTC)
Alistair

Rank: Gold Flake

Groups: Registered
Joined: 14/10/2011(UTC)
Posts: 20
Man
Location: Auckland

Thanks: 4 times
Was thanked: 3 time(s) in 3 post(s)
Yeah I was wondering whether or not another riffle or 2 would be needed. The front of the matting and mesh is held down by a piece of angle upside-down which is temporarily riveted to two piece of angle which run down the length of the box. Once I did a combo that works I will weld the assembly. The riffle section will be held in place with a bolt front and back on each side with a small bolt. Will be very easy to add more riffles.

As the riffles are all connected the sluice can be assembled/disassembled in less than a minute.

As for the flare that's a sore point haha. The guys at work folded it on the wrong mark so I am going to weld an extra piece of aluminium to the side of the flare. Which is unfortunate but it will be ok.

I designed the sluice so it fits into my backpack along with my pans, classifyers and sucker. Aswell as a can or 2 of beer and a nip or 2 of Wiskey and my lunch. My bucket also fits into the bottom of my pack and the sluice fits into the bucket. I will post some pics once she's finished to show the attachments of riffles etc.

Thanks for the advice about the ruffles as I was just going to run the sluice into a pan during it's trial run to see whether or not it needed it. I will add another riffle but still run it into a pan to start with.

Cheers
kiwijw  
Posted : Tuesday, 15 November 2011 10:00:44 PM(UTC)
kiwijw

Rank: Gold Ingot

Groups: Registered
Joined: 28/03/2010(UTC)
Posts: 1,152

Thanks: 92 times
Was thanked: 658 time(s) in 324 post(s)
Hi Alister, Looks like a nice job. Well done. I havnt read all the post but by looking at your set up, & with no riffles I suggest that you pre classify all the material that you put through it. Keep the water flow pretty slow & gentle. Reason being that with no riffles you need to keep the water flow pretty gentle other wise you will wash all the goodies right through it & back into the drink. Yopu only need enough water flow to wash on the unwanted material. if you dont pre classsify with the very small mesh riffles that you have. You will need grater water flow to wash on the bigger material & hence you will wash on the finer gold along with it.

Happy hunting

JW :)
Alistair  
Posted : Wednesday, 16 November 2011 7:49:23 AM(UTC)
Alistair

Rank: Gold Flake

Groups: Registered
Joined: 14/10/2011(UTC)
Posts: 20
Man
Location: Auckland

Thanks: 4 times
Was thanked: 3 time(s) in 3 post(s)
Hey JW,
Yeah I was planning on classifying down to 1/8th or 16th mesh. Takes a bit longer untill your gear starts working but maybe I put in a riffle or 2 and classify down to 1/4 inch!?
kiwikeith  
Posted : Thursday, 17 November 2011 5:15:42 PM(UTC)
kiwikeith

Rank: Gold Ingot

Medals: Outstanding Contribution: Helped organise get together for Paydirt members and volunteered gold claim for the event (Oct 2013)

Groups: Registered
Joined: 28/06/2011(UTC)
Posts: 648
Location: hector

Thanks: 359 times
Was thanked: 230 time(s) in 154 post(s)
looks great yes a couple of riffles will help at the top end only need to be 10mm at the most

what is under the mesh? if matting of some sort make sure the mesh is pushed down hard into it as water can work under mesh
flushing out fine gold

happy hunting
simon  
Posted : Thursday, 17 November 2011 5:20:37 PM(UTC)
simon

Rank: Gold Ingot

Groups: Registered
Joined: 7/01/2011(UTC)
Posts: 789
Man
Location: Central Otago

Thanks: 33 times
Was thanked: 239 time(s) in 150 post(s)
is that black matting the stuff designed for sluiceboxes? it should have a triangular shape to it with a deep v matting to catch the gold.

i have seen a black non-slip floor matting around also. not the same stuff and won't keep a grip of the gold the same.
Alistair  
Posted : Thursday, 17 November 2011 6:19:35 PM(UTC)
Alistair

Rank: Gold Flake

Groups: Registered
Joined: 14/10/2011(UTC)
Posts: 20
Man
Location: Auckland

Thanks: 4 times
Was thanked: 3 time(s) in 3 post(s)
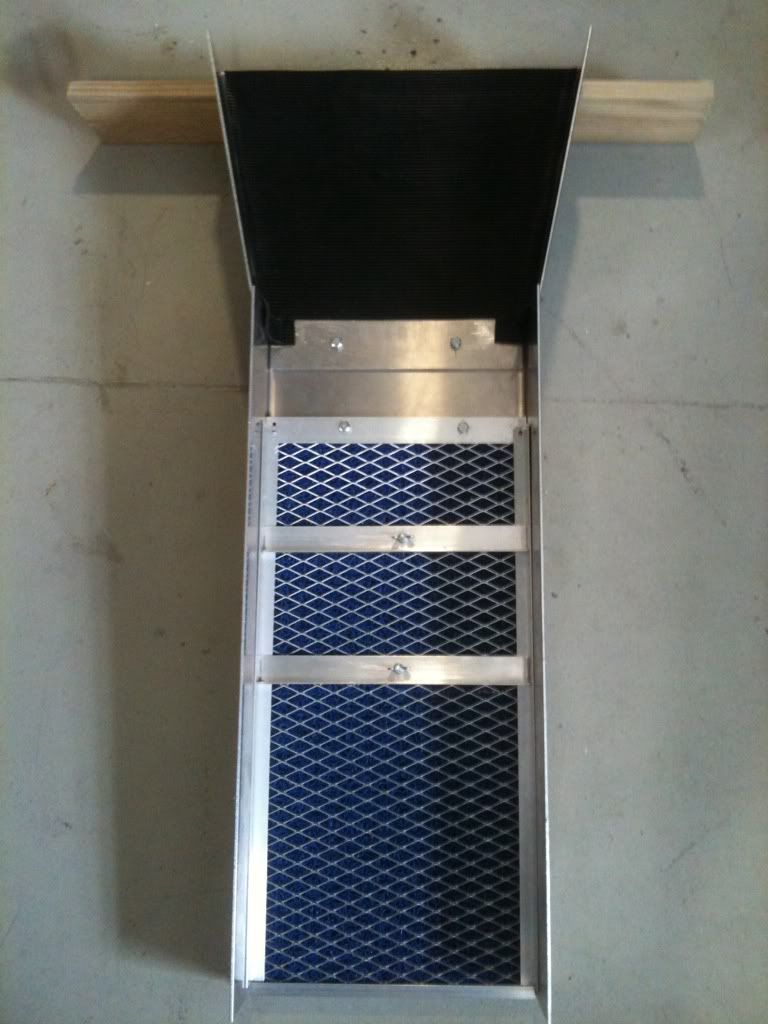
Under the mesh is a vinyl loop dredge matting and when the aluminum angle is pressed down it squashes the matting down about 20%. I have riveted a piece of aluminum section on the end of the box which the matting and mesh will slide under and keep any heavies in the sluice untill clean up. I have added two small (12mm) riffles that are 50mm apart.

The rubber matting in the flare is saw tooth profile and is very deep (about 3-4mm from top to bottom of rib).
I am going to give it a test run early next week so hopefully its going to be pretty sweet.

I think I will classify my material down to 1/4 or 1/8 inch then pan out what's in the classifier between the 2 sizes of classifyers I have just incase I happen across a few decent pieces gold or pieces of quartz with those lovely small veins of gold like JW has posted else where.

I am going to get another one or two folded up as I've spent today on solid works (3d modeling program) and drawn up the box and flare to fit properly and have converted the model to a cut file so work can chuck a piece of scrap on the router and wack them out quickly aswell as marking the fold lines.

Thanks for the help guys I really appreciate it. I will put up more photos soon to show the finished item.
kiwikeith  
Posted : Thursday, 17 November 2011 6:59:33 PM(UTC)
kiwikeith

Rank: Gold Ingot

Medals: Outstanding Contribution: Helped organise get together for Paydirt members and volunteered gold claim for the event (Oct 2013)

Groups: Registered
Joined: 28/06/2011(UTC)
Posts: 648
Location: hector

Thanks: 359 times
Was thanked: 230 time(s) in 154 post(s)
sounds like you have it sorted the black matting is the same as i use with great success the matting works to well as the fine gold works it way to the bottom of the spaggetti to get it back out dry it tue upside down and beat it on the bottom just like you do to mum
apart from the drying bit
good luck remember that each river has its own requirments but looks like you have made a good general box what i have is 3 seperate inserts depending on where im working
Alistair  
Posted : Monday, 21 November 2011 7:28:37 AM(UTC)
Alistair

Rank: Gold Flake

Groups: Registered
Joined: 14/10/2011(UTC)
Posts: 20
Man
Location: Auckland

Thanks: 4 times
Was thanked: 3 time(s) in 3 post(s)
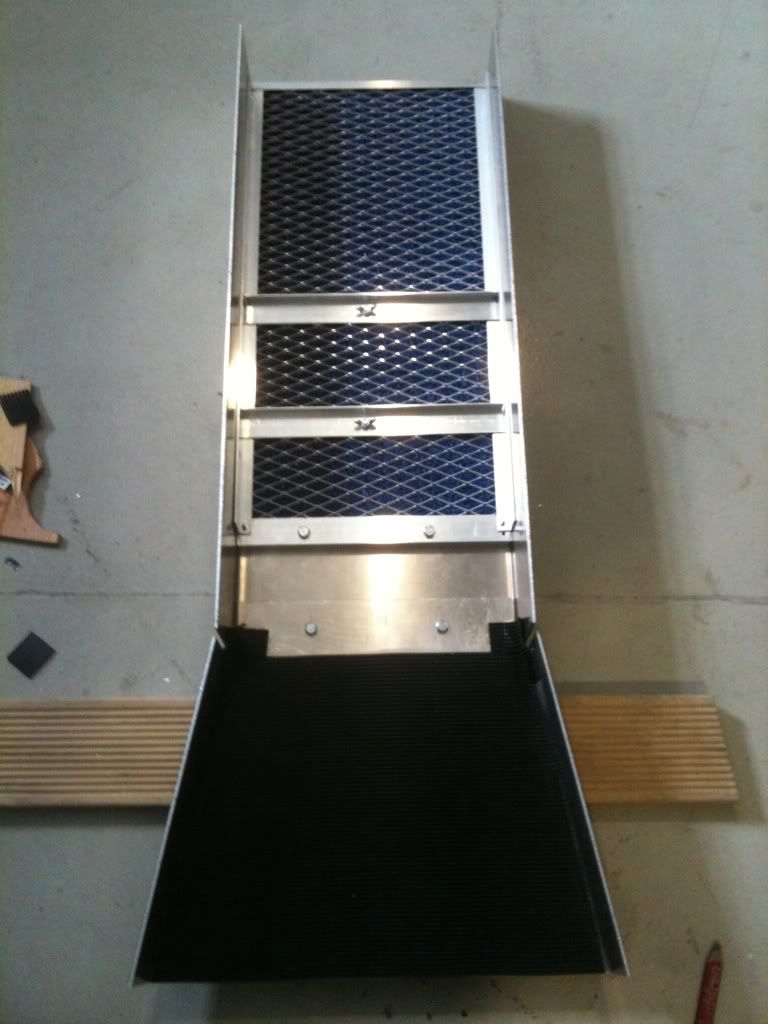
I have temporarily finished it. Once I've tested it and am happy I will take out the bolts and weld the riffles together. Riffles are 12mm high. And there is a caP on the end that the matting slides into to stop the goodies running out the end. I also glued a piece of the ribbed rubber to the side of the flare to cover the hole left by the folding error.... An further advice would be appreciated.
Cheers

UserPostedImage

UserPostedImage

UserPostedImage
gavin  
Posted : Monday, 21 November 2011 8:34:56 AM(UTC)
gavin

Rank: Gold Ingot

Groups: Administrators, Registered
Joined: 20/02/2010(UTC)
Posts: 1,326
Location: Christchurch

Thanks: 736 times
Was thanked: 535 time(s) in 287 post(s)
Looks very professionally put together - nice work!
nzgold  
Posted : Monday, 21 November 2011 8:11:10 PM(UTC)
nzgold

Rank: Gold Nugget

Groups: Registered
Joined: 5/08/2010(UTC)
Posts: 97
Location: New Zealand

Thanks: 23 times
Was thanked: 20 time(s) in 19 post(s)
Does the blue spaghetti matting have a backing?

Edited by user Monday, 21 November 2011 8:16:15 PM(UTC)  | Reason: Not specified

Alistair  
Posted : Monday, 21 November 2011 8:51:36 PM(UTC)
Alistair

Rank: Gold Flake

Groups: Registered
Joined: 14/10/2011(UTC)
Posts: 20
Man
Location: Auckland

Thanks: 4 times
Was thanked: 3 time(s) in 3 post(s)
If you saw it in the flesh you wouldn't be so sure about the putting together quality haha, this will change once it's all welded up though. My father inlaw has just been inspecting it, being an engineer he seemed to think it would be ok but it is too small for his liking. Once I explained the "rules" in NZ around the size restrictions and that this fits into a backpack, and that I can get another section made to make it 1200 long without the flare (1450 with flare) and showed him photos of the keane folding sluice (which is what im going to end up with) he was more accepting of it.

Yeah the spaghetti matt does have a backing.... Is that bad? Should it be an open back? I wasn't sure. But could lay the ribbed rubber matting down the whole length the use the unbacked matting... Just so may options as well.
Is the matting preferable for small gold? Or best to go for the artificial grass type mat?